
Page 23 - ABF Newsletter April 2025
P. 23
IMPROVE YOUR DEFENCE
with Ron Klinger
Solution to problem on page 2
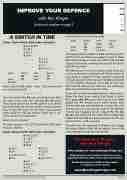
A SWITCH IN TIME
Teams. Dealer North. Both sides vulnerable.
At both tables, South ended in 4[:
WEST NORTH EAST SOUTH 1] pass 2[
pass 2] pass 3NT pass 4[ all pass
The killing defence is {9 to the {K and the diamond switch to the ace. West now needs to revert to clubs. East wins and plays a third club. West ruffs and this ‘uppercuts’ dummy, creating a trump trick for East to take 4[ one down.
Will West know to revert to clubs at trick three and not try to give you a diamond ruff. Might the }J not have been a singleton? If East wanted a diamond ruff, East should win trick one with the {A and switch to the singleton diamond. From {K at trick one, West should deduce that East has two diamonds. West should therefore revert to clubs.
If you did not find the killing defence, take comfort. When the deal arose, neither East found it either. Both played {K, {A and a third club at once. West played the [7, forcing out a heart honour from dummy. East was now entitled to a trump trick, but that turned out to be the last trick for the defence. The }A went begging. South played [A, [K, ]A, ]K, ]Q, discarding the }9. Then came the ]10. East ruffed with the [Q, but South pitched the }K and had ten tricks, +620, no swing.
The deal was also reported in Sharpen Your Bridge Technique (How to think like an expert), one of the many excellent books by Hugh Kelsey.
The Real Deal Workout with Ron Klinger
Now available at: www.ronklingerbridge.com
Bridge questions and answers emailed to you and featuring deals from actual events, local and overseas.
Details and samples available on the website. To subscribe, please contact:
suzie@ronklingerbridge.com
WEST
pass all pass
] A K Q 10 7 [ J 10 5 }Q52
{ 10 8
N WSE
NORTH 1]
3[
]432 [Q96 }J7 {AK432
SOUTH 2[ 4[
West leads the {9: eight - king - five. How would you continue as East?
*****
From the lead of the {9, you can deduce that West has one or two clubs. You can play {K, {A and a third club. If partner has the [K, partner can ruff that and your hearts are strong enough to ensure a heart trick to take 4[ down. On the other hand, partner might have the }A and weaker hearts and a dia- mond switch can work better.
Which do you choose?
The deal arose in the 1979 Vanderbilt (USA Open Knockout Teams):
Teams. Dealer North. Both sides vulnerable.
] A K Q 10 7 [ J 10 5 }Q52
{ 10 8
]J85
[87
} A 10 8 6 4 3 {96
]96
[ A K 4 3 2 }K9 {QJ75
EAST pass pass
]432 [Q96
} J 7 {AK432
Australian Bridge Federation Ltd. Newsletter: April 2025
Page: 23
