
Page 23 - ABF Newsletter August 2025
P. 23
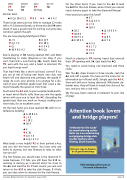
WEST NORTH EAST SOUTH 1[ 2NT 3[ 3]
On the other hand, if you cross to the ]A to lead the {10 for the club finesse, when it fails you cannot reach dummy again to take the diamond finesse!
How would you play this hand? ]K7
[AQ653 }J74 {Q85
] 10 2 ]QJ8654 [ 10 8 4 [9
} 10 9 5 2 }Q83
{ K 10 9 3 {A76
]A93 [KJ72 }AK6 {J42
North is playing in 4[, having heard East overcall their 1[ opening with 2]. East leads the ]Q.
You need to avoid losing one diamond and three clubs.
Win the ]K, draw trumps in three rounds, cash the ]A and ruff a spade. You have set the scene for an elimination (or ruff-and-sluff). Simply cash the }A-K, then exit with your losing diamond. Whichever de- fender wins, they will have to break the club suit for you, and you win a club trick.
(By the way, East’s overcall is irrelevant to your line of play.)
Attention book lovers and bridge players!
“A Murder On The Cards“ by award-winning author Katie Jay is an entertaining and gripping bridge club murder mystery set in Glenelg, South Australia.
Get your copy at Amazon or all good bookshops
Visit katiejayauthor.com.au for more information
Pass 5{ Partner held:
All Pass
] K Q J 10 6 5 2   [ 8 3   } 4   { 5 4 2
Those clubs were just too little to manage 12 tricks with a 4-2 diamond break, so those who bid 6{ went down. It was a good hand for sorting out some less common system though!
You are now playing Matchpoint Pairs:
]J4 ]AQ9 [ Q J 7 2 [ K 10 6 }Q }K543 { 10 9 8 5 4 2 { K Q J
East is playing in 3{ having opened 1NT, and West transferring to clubs (Stayman is too risky, if you can’t then bid a non-forcing 3{). South leads the [9, won with the ace, and a heart is returned. Do you lead trumps now?
That lead feels like a short suit lead, correct? If so, you are at risk of losing one heart, one club, one heart ruff, one diamond and, perhaps, the spade fi- nesse. As such, your priority is to arrange for a dis- card of your potential spade loser first. Lead a dia- mond towards the queen at trick three.
South wins the }A and, to your surprise, leads anoth- er heart which North ruffs. Now you win the spade return with your ace to lead the }K, discarding the spade loser, then you work on trumps, making your nine tricks, for an excellent score.
On the next hand, you have reached 5{, with no in- terference bidding:
] A 10 8 6 5 [J93
} J 10 2
{ 10 3
]4
[ K 10 }AK73 {AQJ652
West leads a very helpful [2 to their partner’s Ace, and you win the heart return. You have only one entry to dummy, but two finesses to take, so what can you do?
The first finesse you should take is the diamond fi- nesse because, if it fails, you still have the }10 re- maining in dummy as a second entry! So cross to the ]A and lead the }J. If East covers, you win and return to the }10 to take the club finesse. If it fails, you can also return to dummy for the club finesse.
Australian Bridge Federation Ltd. Newsletter: August 2025
Page: 23
